Update: April 24, 2008 Today Ubuntu 8.04 was released, and it’s a much easier install. Ignore the directions below, and instead jump to my post for April 24th, 2008 – Installing Ubuntu 8.04 under Microsoft Virtual PC 2008.
Like a lot of folks I was interested in working with the latest Ubuntu. However, I had some real issues getting it installed under VPC. On the good news side the pesky mouse problem is gone, apparently the kernel got updated to fix the mouse bug that plagued us with 7.10.
A quick disclaimer, the instructions below were created using BETA software. As new betas trickle out, or the final version is released, some of the things here may or may not work for you.
I do have some bad news. Attempting to install the standard desktop version, when the install got 6% into the Partitioning phase the VPC either locked up, or crashed all together with an unrecoverable error. Now for the good news, I did find a way to get Ubuntu 8.04 Beta installed, but it took some work on the post install to get the display to work. Hang with me though and I’ll show you the steps.
First, you need the right bits. Go to the http://www.ubuntu.com/testing/hardy/beta website . Scroll past the download area and find a mirror that is appropriate to your area. I chose http://mirrors.easynews.com/linux/ubuntu-releases/8.04/ as I live in North America, but all of the pages look the same.
Once on the mirror site, scroll down past the Desktop area, down past the Server section, until you find the “Alternate install CD” area. That’s the one you want! I used the one for the PC Intel platform.
OK, fire up Virtual PC 2007 and create a new machine, I’ll assume you are familiar with VPC and won’t recreate those instructions here. Only note I’ll make is to make sure and pick ‘Other’ for the OS, and for memory you need at least 256 meg of ram for Ubuntu, 512 would be better. Of course if you have more, feel free to bump it up to 768 or even 1024. Since I had the available ram I used 768.
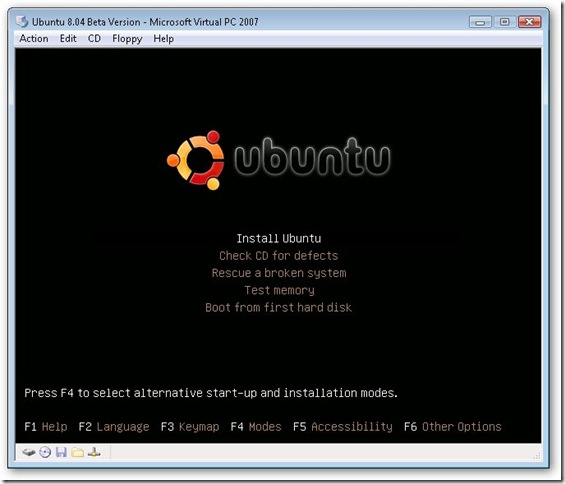
Boot the machine, and use the CD menu to mount the Alternate Install CD ISO that you had downloaded. After it boots you’ll see this screen:
Just press Enter to continue to the next screen.
Again, all we have to do is press Enter to continue.
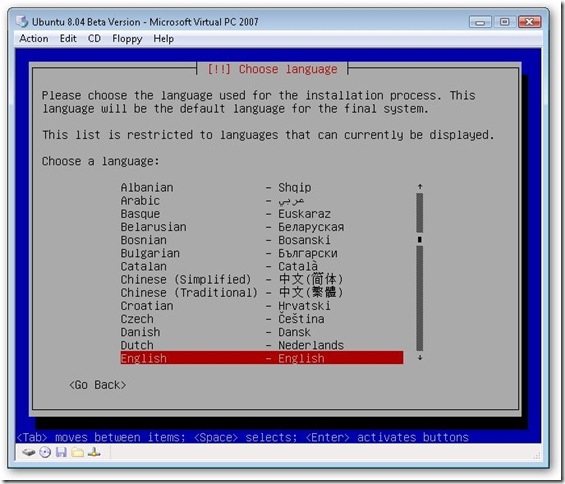
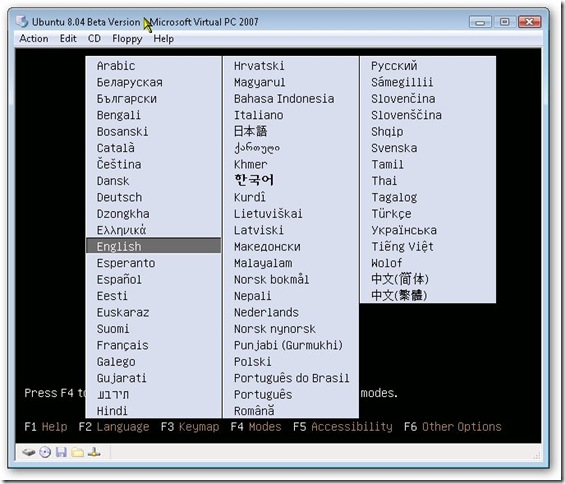
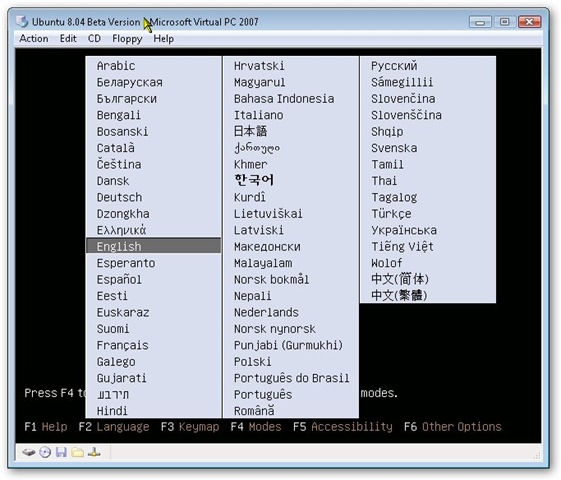
Now select your native language. Since mine is English all I had to do is press Enter.
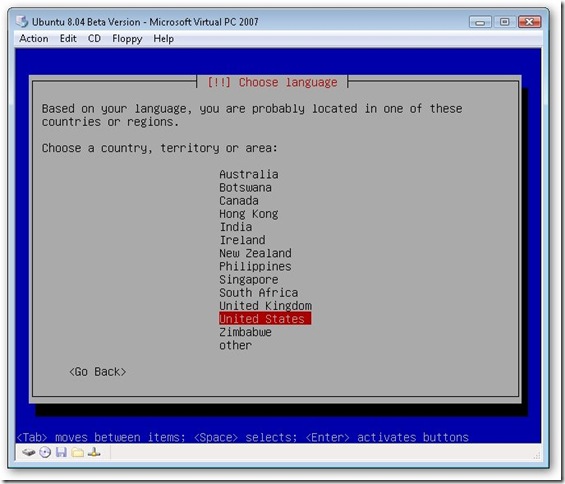
After picking my language, Ubuntu further wants to narrow in on where I live by asking about my country. I picked my country and pressed Enter.
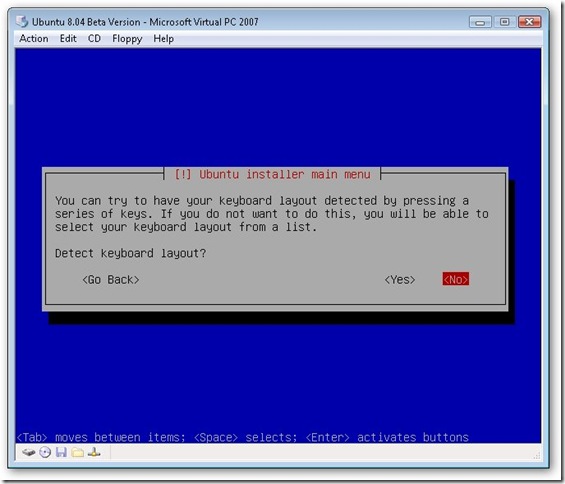
Next Ubuntu wants to detect my keyboard. If you want you can go through the default of Yes, and walk through a series of screens where you press a letter on your keyboard, or tell it you don’t have that key. Frankly I found it much faster just to tell it what kind of keyboard I had, and picked No and pressed Enter.

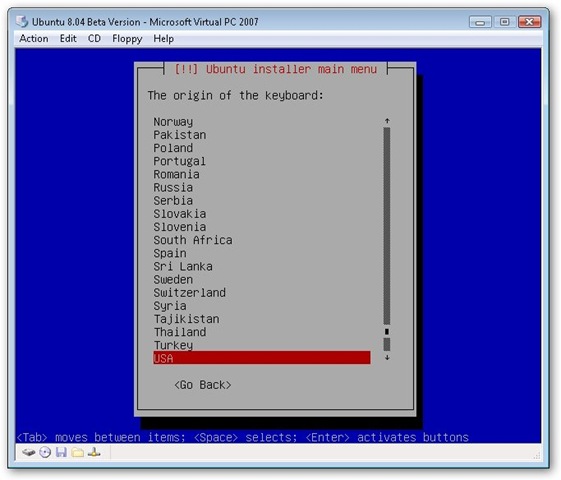
Now it’s asking what the origin country of my keyboard is, since mine is USA (the default) all I had to do is press Enter.
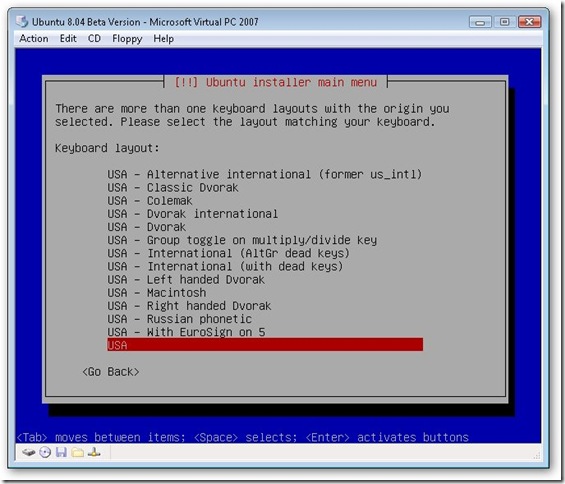
Next I’m asked what keyboard type. If you want to use something different (I know a few fans of Dvorak) you can pick those, but since I’m using a standard keyboard, I just went with the default you see above and pressed Enter. A
After doing so, the installer went through a series of screens where it was doing a lot of scanning of my (virtual) system and installing various components. It took about 10 to 15 minutes to get to the next screen.

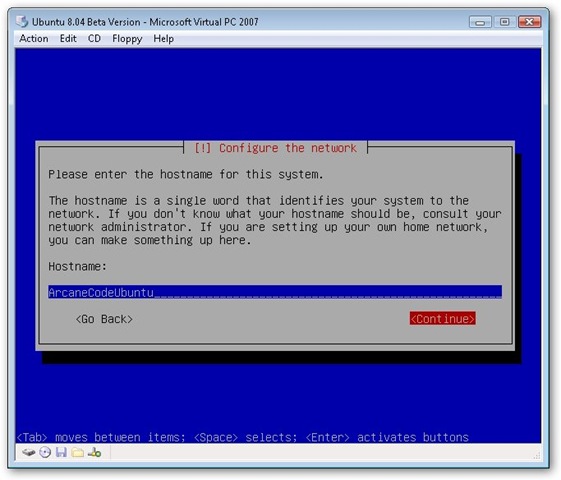
Here we are asked to give our system a name as it will be known on the network. The default name is ubuntu, but I modified it to what you see above so it would be unique. I would advise you to do the same, in case you wind up running your VPC on a network with others. Once you name your system, tab to Continue and press Enter.
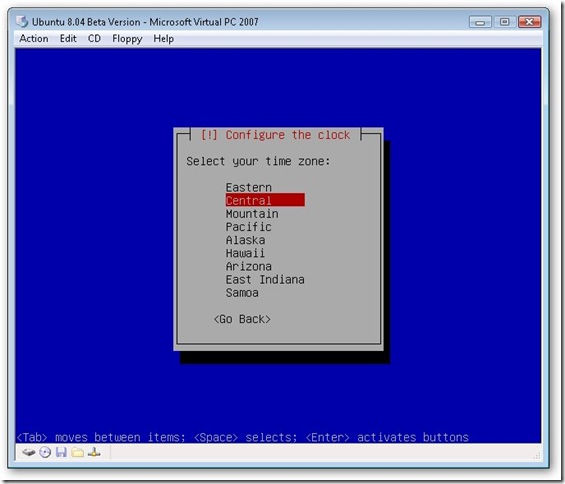
On this screen you are asked what time zone you live in. I live in the great state of Alabama, which is in the Central time zone, select the time zone for your state and press Enter.
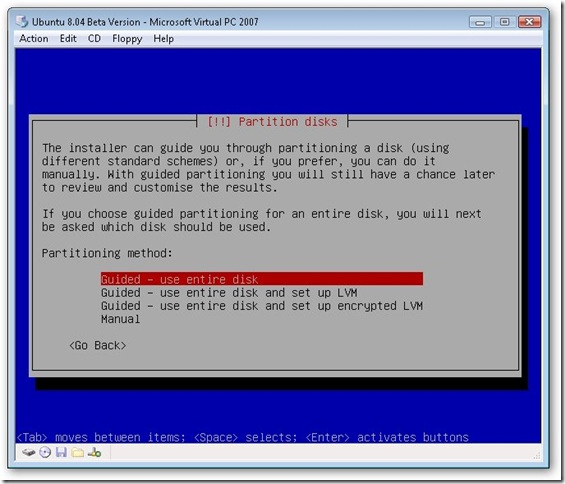
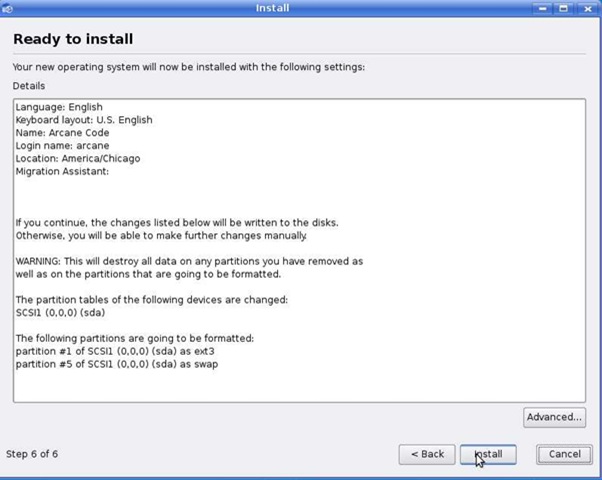
Next we are asked about partitioning the drive. I just took the default that you see here and pressed Enter.
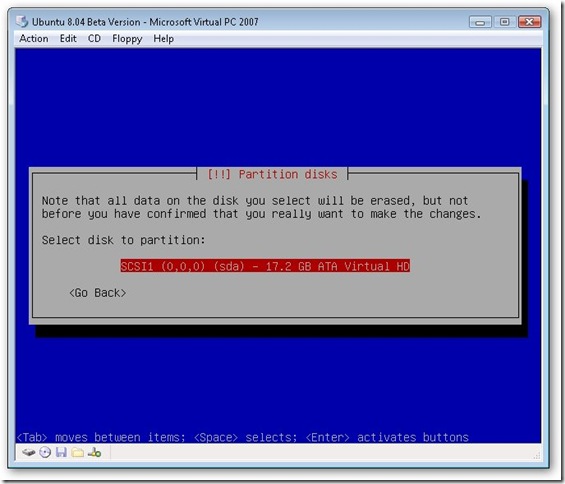
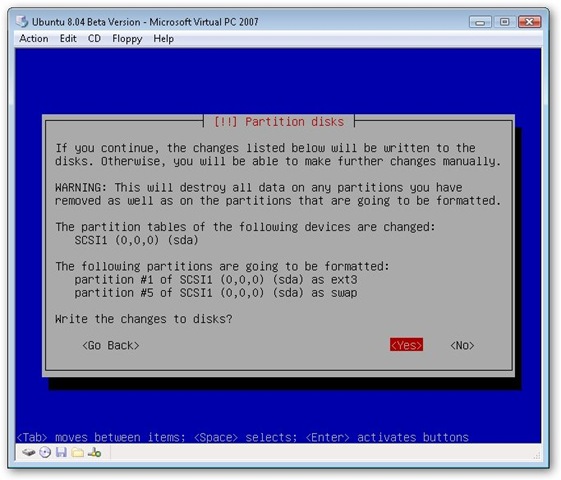
Now Ubuntu wants to make sure we understand that it’s about to wipe out what’s on the drive. Since it’s just a virtual drive, that’s fine we can safely press Enter to continue without risking any damage to our host ‘real’ hard disk.
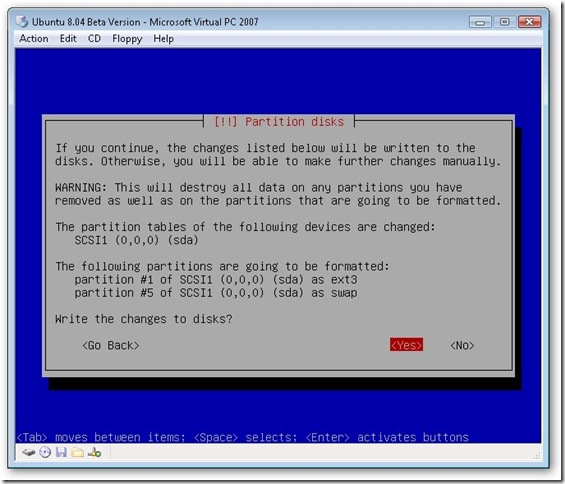
Ubuntu wants to make sure we really understand it’s about to wipe the drive and create two partitions. It even makes the default No. Change the answer to Yes, and press Enter. At this point a rather long process begins, on my system it was around fifteen to twenty minutes. Your time may vary depending on your system speed and hard disk speeds.
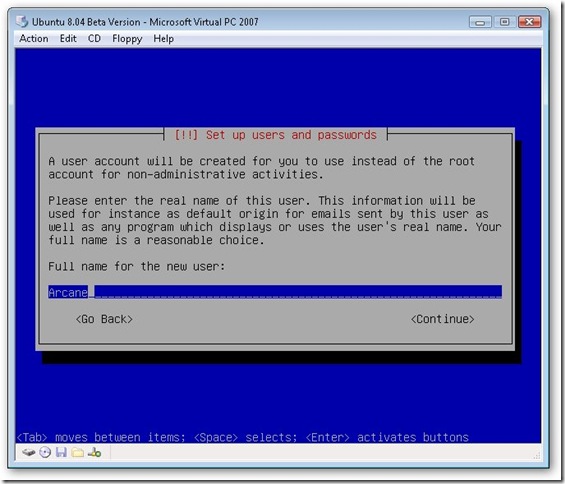
Now we are asked for our full name. I just entered my nick name here, but you can put your full name if you wish. This will not be your login, but just used as the initial default in e-mails and the like. Once you enter a name, tab down to Continue and press Enter.
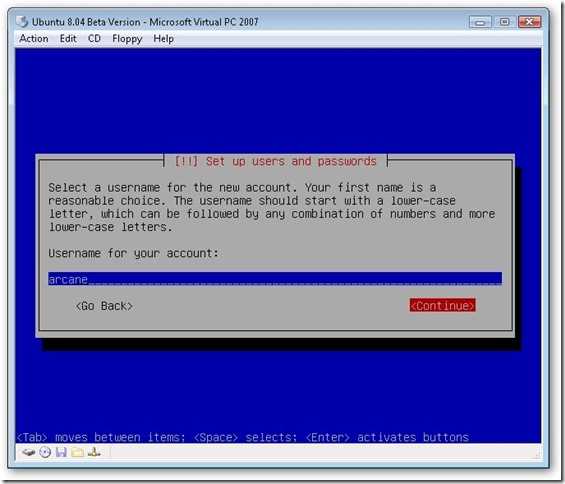
OK, now it is asking you what name you want to use for a login / user ID. Make sure you pick something good as you may be keying this often. By default the installer takes your first name and lower cases it. That’s fine for me, so I’ll just press Enter to continue.

Next you are asked for a password. Enter a good password, tab down to Continue and press Enter. On the next screen, which I won’t bother to show you as it looks almost identical to this one, it asks us to retype the password. Do so, again tab down to Continue and press Enter to proceed to the next screen.
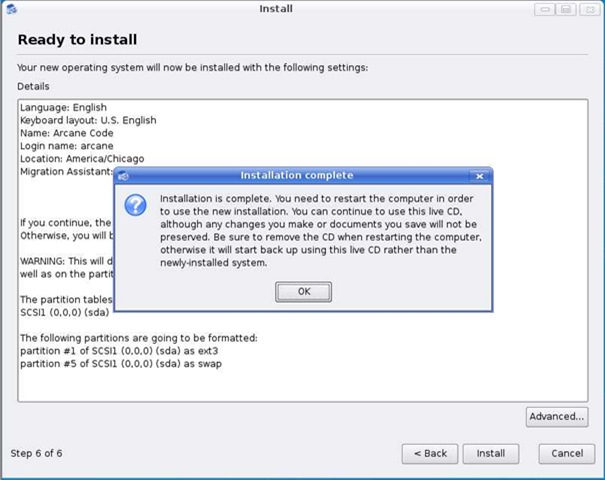
Ubuntu will do a short install, then show you this:
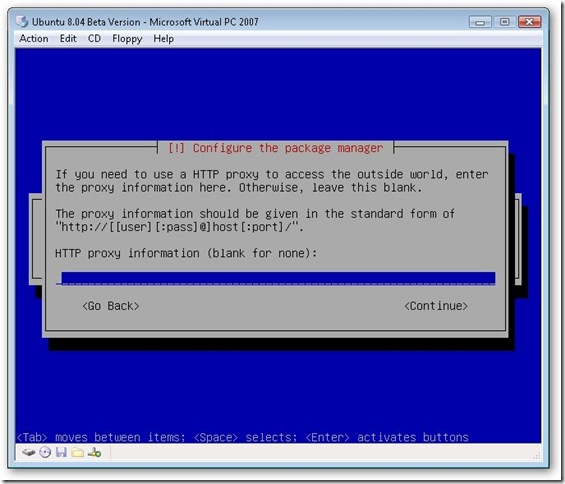
Ubuntu wants to find out if you need to use a proxy server. If you do, enter it here. Most people do not, so all you have to do is tab down to Continue and press Enter.
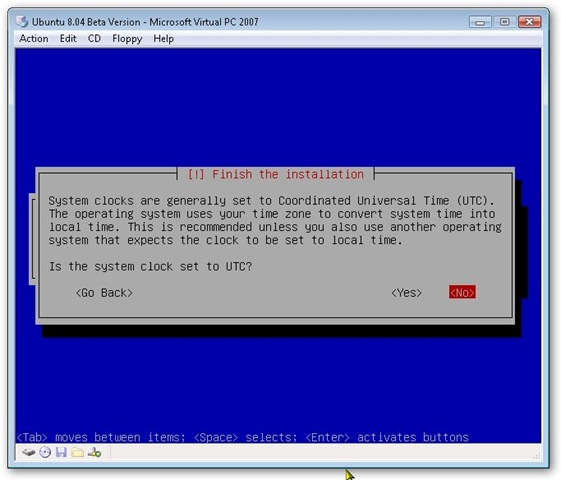
One last question from Ubuntu, asking about the system clock:
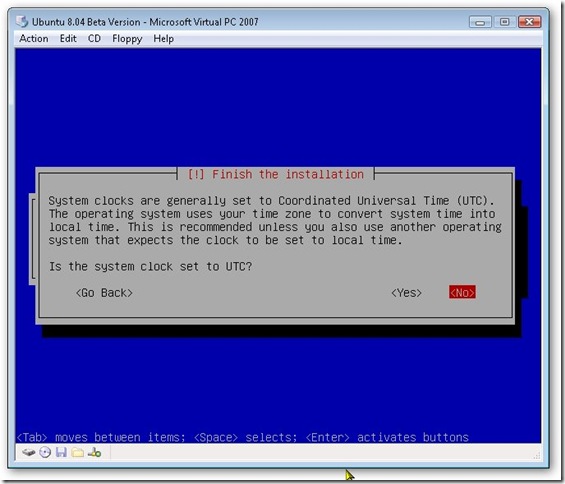
While it’s true many servers are set to UTC, most home machines are not, so I took the NO option and pressed Enter. On my system it took about an hour before I got to the next screen. It didn’t hang up through most of it until the very end. It stayed at 97% – Cleaning up… for quite a bit. But eventually it moved on to the next screen.

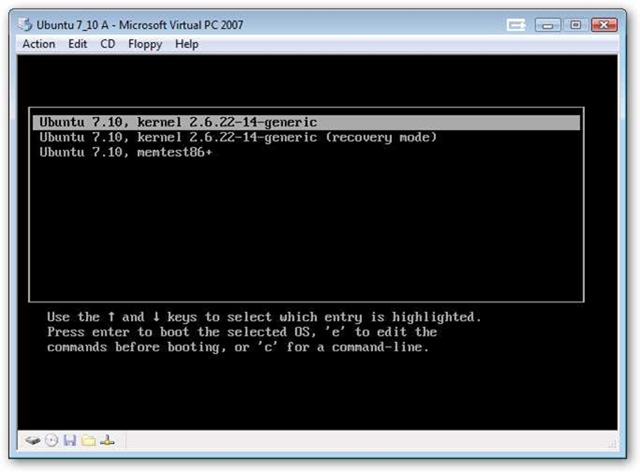
OK, you may think this is the finish line, but not quite. We still have to edit two files before we can use the system, otherwise we wind up with garbled graphics. When you press Enter on the screen above to reboot, look very carefully at the screen during the reboot. When you see the line:
Grub Loading Please Wait…
Immediately press the ESC key, and you should see this menu.
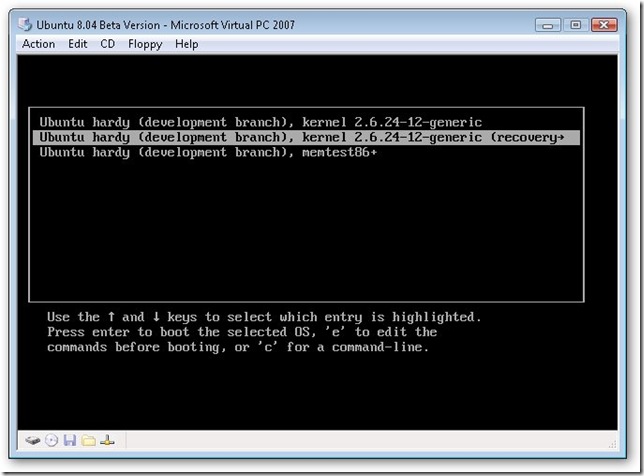
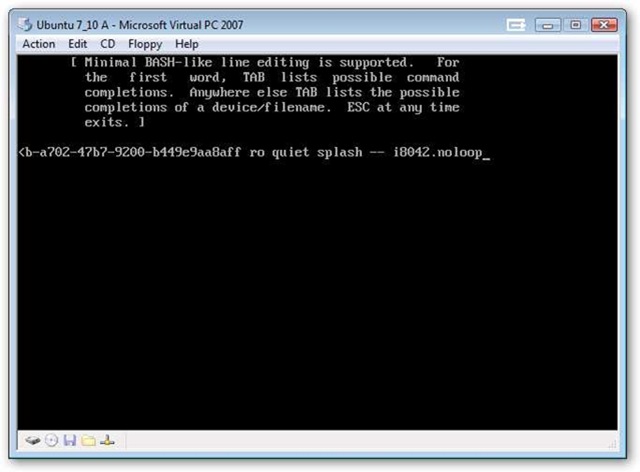
Change the menu to the second option and press e to edit the line. This will bring up the next screen.
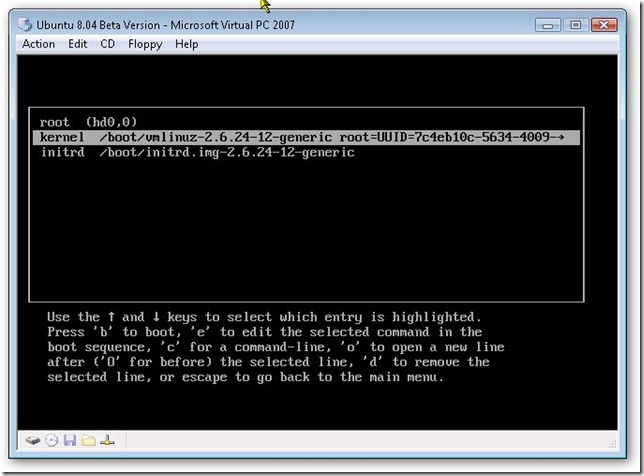
Move to 2nd line and press e to edit. At the end of the line, add a space then vga=791 . Press Enter to save the change, which returns you to the above screen. Now press b to boot. The system will work, the screen may even go black for a minute, but eventually you will bring you to the following display.
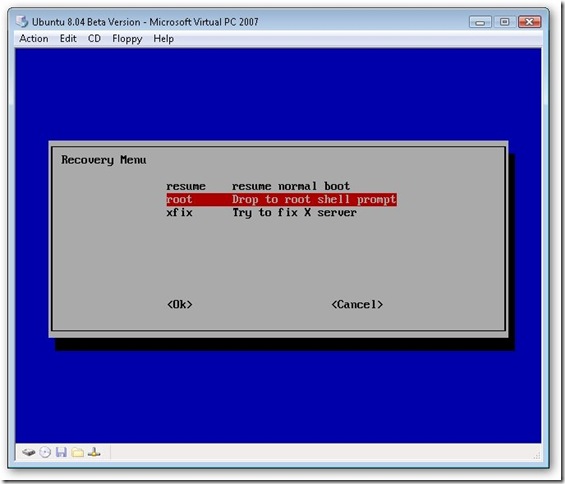
Change option to root – drop to root shell prompt, tab to OK and press Enter. This will drop you to a command prompt.
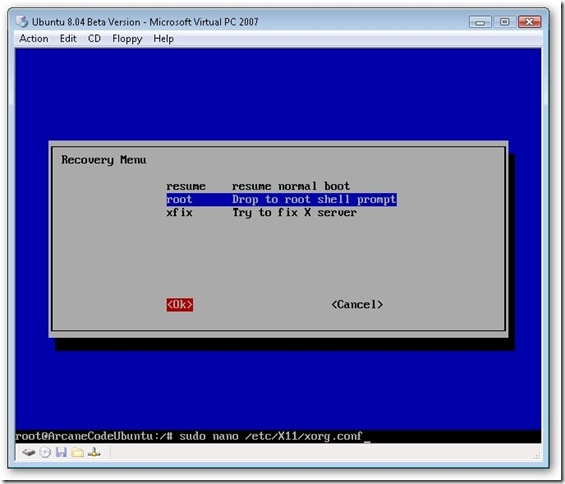
At the command prompt, type sudo nano /etc/X11/xorg.conf and press Enter. This will bring up the nano editor, and let you edit the file that controls system settings.
Scroll down until you find the section titled Section “Screen” . At the bottom add the line DefaultDepth 16 as you see in this snapshot:
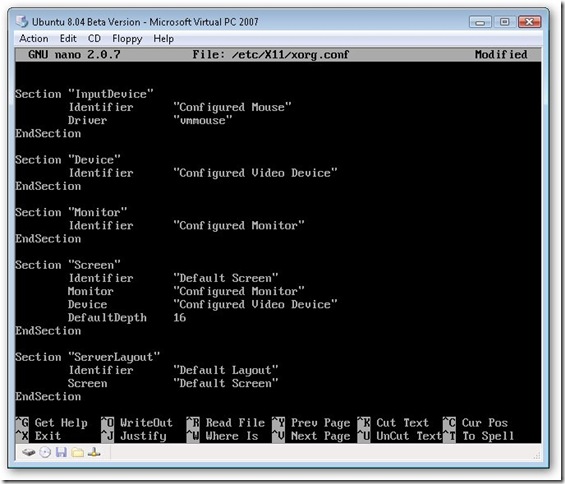
I put spaces, not tabs between DefaultDepth and 16. Once done, press CTRL+O (that’s the letter O, not a zero) to writeOut the file, then CTRL+X to close the editor.
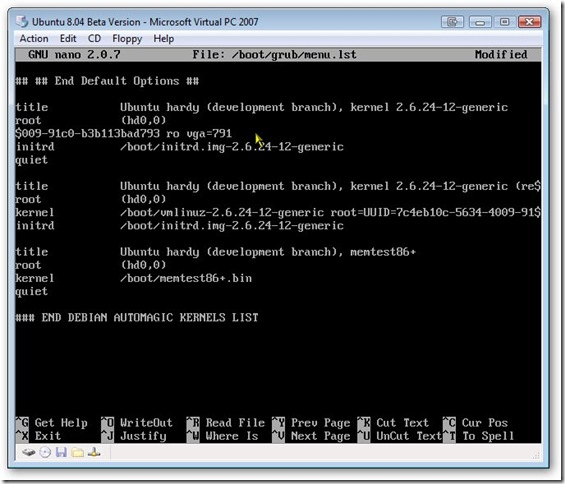
OK, one more file to edit. Now type in sudo nano /boot/grub/menu.lst as you see in this screen snippet, and press Enter.

Now scroll down to the very end of the file. What we are looking at is the menu that appears when you press the ESC key on the GRUB loader. We are going to modify the first item, which is the default, to boot in VGA 1024×768 16k color mode.
Find the first line that says kernel at the end of the file (see where my mouse is pointing in the screen capture below.

Hit the END key to go to the end of the line. The line ends with quiet nosplash. Remove those two words and replace them with vga=791 , as you see below.
Hit CTRL+O (that’s the letter O for writeOut) to save it, then CTRL+X to exit the nano program. When you are returned to the command prompt, type in sudo reboot and press Enter to reboot Ubuntu.
This time, don’t press anything at the grub menu, just let it load. What I found was during the boot you wind up with a black screen that lasts about one minute, but if you carefully observe you’ll notice your drive light flashing. It then returns to a text screen, and eventually you are presented with a pretty screen asking you to login.
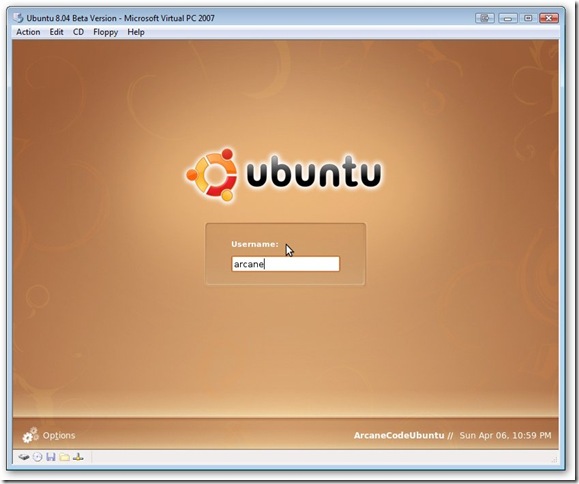
Enter your user name and press Enter, then on the next screen type in your password and press Enter again. And after a minute or two of churning… TA-DA!
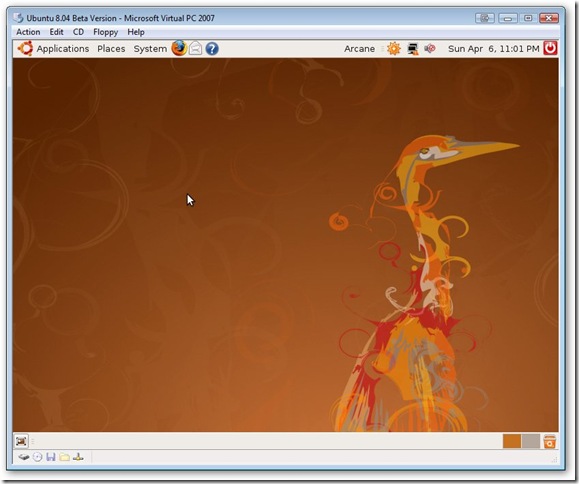
I’m still looking into things like networking and sound, but at least these instructions will get you up and running with the Beta.
As I said at the beginning, these instructions are based on BETA code. When the final version is released sometime this month things may or may not change. Feel free to post your experiences in the comments area, along with any tips you may have on getting up and going with things like networking and sound.


![[image - Select Language]](https://arcanecode.com/wp-content/uploads/2008/04/u804-01.jpg)
![[image - Safe graphics mode]](https://arcanecode.com/wp-content/uploads/2008/04/u804-02.jpg)
![[image - live environment]](https://arcanecode.com/wp-content/uploads/2008/04/u804-03.jpg)
![[image - Installer welcome screen]](https://arcanecode.com/wp-content/uploads/2008/04/u804-04.jpg)
![[image - Installer Set Time Zone]](https://arcanecode.com/wp-content/uploads/2008/04/u804-05.jpg)
![[image - Installer Pick your Keyboard]](https://arcanecode.com/wp-content/uploads/2008/04/u804-06.jpg)
![[image - Installer Prepare Disk Space]](https://arcanecode.com/wp-content/uploads/2008/04/u804-07.jpg)
![[image - Installer Who Are You]](https://arcanecode.com/wp-content/uploads/2008/04/u804-08.jpg)
![[image - Installer is Ready]](https://arcanecode.com/wp-content/uploads/2008/04/u804-10.jpg)
![[image - Install complete time to reboot]](https://arcanecode.com/wp-content/uploads/2008/04/u804-11.jpg)
![[image - Fix Networking]](https://arcanecode.com/wp-content/uploads/2008/04/u804-12.jpg)
![[image - Ubuntu open for business]](https://arcanecode.com/wp-content/uploads/2008/04/u804-13.jpg)


![[Picture 1 - Welcome to Virtual Disk Wizard]](https://arcanecode.com/wp-content/uploads/2008/03/vpcdiffdisk01.jpg)
![[Picture 2 - Create a new virtual disk]](https://arcanecode.com/wp-content/uploads/2008/03/vpcdiffdisk02.jpg)
![[Picture 3 - Disk Type]](https://arcanecode.com/wp-content/uploads/2008/03/vpcdiffdisk03.jpg)
![[Picture 4 - Disk Location]](https://arcanecode.com/wp-content/uploads/2008/03/vpcdiffdisk04.jpg)
![[Picture 5 - Hard Disk Options]](https://arcanecode.com/wp-content/uploads/2008/03/vpcdiffdisk05.jpg)
![[Picture 6 - Pick Base Hard Drive]](https://arcanecode.com/wp-content/uploads/2008/03/vpcdiffdisk06.jpg)
![[Picture 7 - Complete Disk Creation]](https://arcanecode.com/wp-content/uploads/2008/03/vpcdiffdisk07.jpg)
![[Picture 8 - Confirmation Message]](https://arcanecode.com/wp-content/uploads/2008/03/vpcdiffdisk08.jpg)
![[Picture 9 - Create Machine Wizard]](https://arcanecode.com/wp-content/uploads/2008/03/vpcdiffdisk09.jpg)
![[Picture 10 - Create a machine]](https://arcanecode.com/wp-content/uploads/2008/03/vpcdiffdisk10.jpg)
![[Picture 11 - Macine name and location]](https://arcanecode.com/wp-content/uploads/2008/03/vpcdiffdisk11.jpg)
![[Picture 12 - Confirm Operating System]](https://arcanecode.com/wp-content/uploads/2008/03/vpcdiffdisk12.jpg)
![[Picture 13 - Select default amount of memory]](https://arcanecode.com/wp-content/uploads/2008/03/vpcdiffdisk13.jpg)
![[Picture 14 - Existing Disk or New Disk - We want existing]](https://arcanecode.com/wp-content/uploads/2008/03/vpcdiffdisk14.jpg)
![[Picture 15 - Pick name of existing disk]](https://arcanecode.com/wp-content/uploads/2008/03/vpcdiffdisk15.jpg)
![[Picture 16 - Complete Machine Wizard]](https://arcanecode.com/wp-content/uploads/2008/03/vpcdiffdisk16.jpg)